

This DIY smartphone projector is a fun and quick project. It turns out that it’s easy to turn your phone into a digital projector. You just need a few materials and a bit of ingenuity. Better yet, the cost of this project is around $1. Read on to find out how to make your own DIY smartphone projector.
Materials needed:
- Smartphone
- Magnifying lens (should be available at your local dollar store)
- Shoe box
- Paperclip
- X-acto knife
- Black electrical tape

Step 1 – Trace a hole
This project is a perfect example of why we never throw away a shoe box. They are just so great for so many different things!
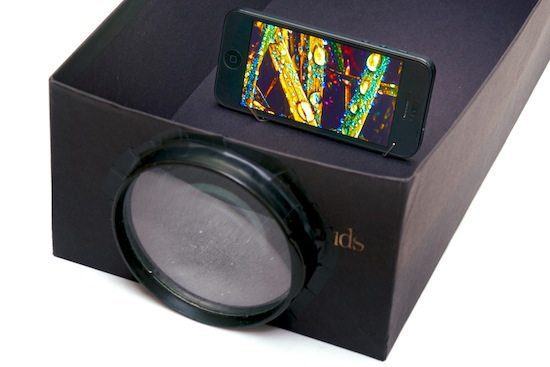
To make your DIY smartphone projector grab a shoe box. Shoe boxes with dark insides work best, however you could always add some black paper or paint to adapt a lighter coloured box.
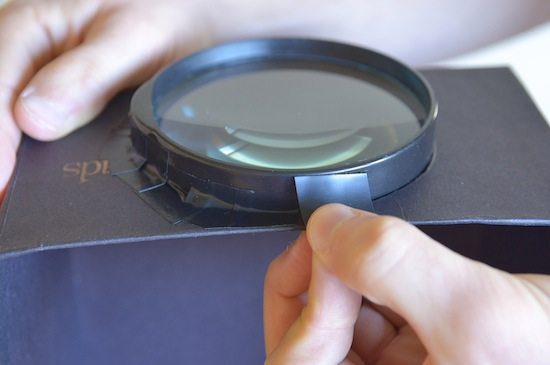
Working with the short side of the shoe box, trace around the outer edge of the magnifying lens. You might want to detach the handle from the lens of the magnifying glass first.

Step 2 – Cut out the hole
Using your x-acto knife, cut out the hole you just traced. Try to cut right on the line as you don’t want to let any light leak into the box.

Step 3 – attach the lens to the box
Now you want to attach the magnifying lens to the shoe box. Line up the lens to the cut out hole. Apply your black electrical tape around the entire edge of your lens. Make sure that the lens is snug and there are no holes for light to come through.
Step 4 – make a stand
The next step is turning your paperclip into a stand for your smartphone projector.

Step 5 – flip your phone’s screen
Here’s an interesting fact of science: when light passes through a lens the image gets flipped. Therefore in order to display your projected images correctly, you’ll need to flip your phone’s screen.
On an iPhone go to Settings > General Settings > Accessibility > Assistive touch > On.
This will activate an orb that you can use to flip your screen in photo applications. To activate the orb just tap it. This will allow you to rotate your screen.

Step 6 – find focus
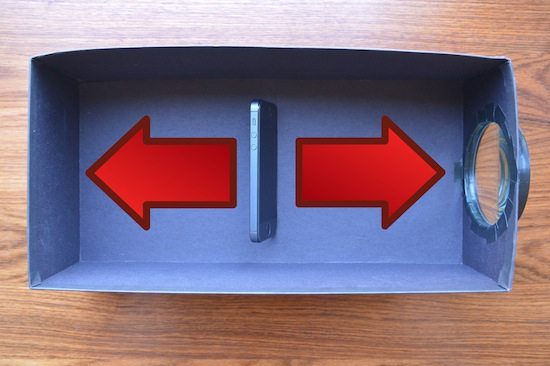
Locate a blank wall to project onto. In order to focus the image you’ll need to find the optimal placement for your phone in the box. Place your phone on it’s stand in the middle of the box. Walk it forwards and backwards until your image is nicely focused.
Step 7 – optimize the viewing experience
For the best viewing experience, turn off all the lights in the room and turn on full brightness on your phone. Be sure to use the slideshow mode on your photo app so you can go hands-free. Now step back and enjoy your new DIY smartphone projector!

Source: Makezine
Genius!
Totally cool! I have to try this one!.
I tried this a couple times and it doesn’t work.
this is cool!!
Totally cool
Cool idea, but it doesn’t work